How to cut a person out of a picture using python

Disclaimer, this tutorial is intended more for people who just need to remove the background on the image, and not for advanced computer vision developers.
In this tutorial, we will make a pipeline for high-quality automatic background removal around a person using AI.
The pipeline includes following steps:
1. Background areas selection.
2. Filtering.
3. The final cleaning.
Software installation
The project requires python with the installed jupyter, pytorch 1.6, torchvision and opencv.
We will install these programs for Windows 10, if you know how to do it yourself, skip this section.
At first, download Anaconda Individual Edition and install it(you can keep the default parameters of installer unchanged).

Next, open Windows Menu>Anaconda3 (64-bit)>Anaconda Prompt.

Type pytorch installation commands in Anaconda console (shown below).
conda install pytorch torchvision torchaudio cudatoolkit=10.2 -c pytorchconda install opencv
Now, we have python installation ready for use in Computer Vision & Image Processing tasks. Let’s create a script for our background deletion toolchain.
Background areas selection
Open Windows Menu>Anaconda3 (64-bit)>Jupyter Notebook.

Anaconda starts local server and opens Jupyter page in your default web browser. In web page Files menu select New>Python 3 like in the image below.

Now, we have a jupyter window where we can run commands of our toolchain. Copy/Paste commands from tutorial in cells In []: and press Ctrl+Enter to run it.

Next, we will write a script for high-quality PNG files generation with removed background.
Background areas selection
At first, we add code for background areas selection. It uses the DeeplabV3 neural network(library import and model loading code is shown below) from the PyTorch library, which assigns a specific class to each pixel in the image.
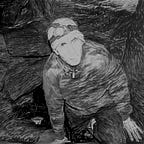
Next step is loading the image for background removal. Models require a lot of resources for inference, so we will use a smaller copy of the image during processing. At the last stage we will return to the original size (the python code and the original image are shown below).

The procedure for selecting the background on an image is the block below. Deeplab works with normalized data, so the deeplab_preprocess transformation is applied to the image before using the model. The foreground is defined as a set of areas with class #15 (person).
The result of apply_deeplab is shown in the picture.

In General, most of the image is marked correctly, but if you use this mask to remove the background unchanged, the image will look unnatural due to artifacts on the foreground/background border(see the picture).

Soft foreground selection or image matting
Image matting is the process of accurately selecting the foreground and background in images and videos. If during segmentation for each pixel of the image a single label is determined — the class of the object it belongs to (in our case, foreground/background), then when matting images, some pixels may have several labels with different fractions at once, so-called partial or mixed pixels. To completely separate the foreground from the background in the image, an accurate estimate of the alpha values for mixed pixels is made.
In our project, we will use the F, B, Alpha Matting code from the repository of Marco Forte, François Pitié.
Let’s download the code from the repository to the project folder
git clone https://github.com/MarcoForte/FBA_Matting.git and a file with the model weights from the official Google Drive.
Next, import the FBA_Matting into the image processing script.
Create a configuration and load the FBA model.
Segmentation results filtering and generation of trimaps
As input parameters, FBA uses trimaps — mask with unconditionally foreground pixels, unconditionally background pixels, and pixels for which the model should calculate the alpha channel values.
Below is the code for generating a trimaps using erosion. It “eats” pixels located near the foreground/background edges, thus pointing the segmentation refinement areas for FBA.

Further we apply the F, B, Alpha Matting model to image.
Then, go back to the original size and save the image.
As a result, we got an image that can be used in the image editor without additional modifications.

Source codes are available here.
References
- https://pytorch.org/
- Liang-Chieh Chen, George Papandreou, Florian Schroff, Hartwig Adam. Rethinking Atrous Convolution for Semantic Image Segmentation.
- Pytorch Team. DeepLabV3 model with a ResNet-101 backbone. https://pytorch.org/hub/pytorch_vision_deeplabv3_resnet101/
- Marco Forte, François Pitié. F, B, Alpha Matting.
- https://github.com/MarcoForte/FBA_Matting.